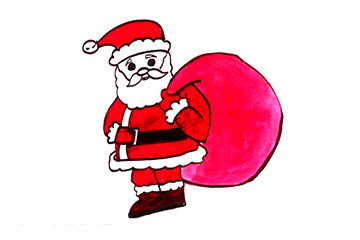
Santa Claus Drawing Step by Step
Drawing Santa Claus, the beloved figure of Christmas, can be a fun and festive activity. Whether you’re an experienced artist or a beginner, following a step-by-step process can help you create a jolly depiction of St. Nick. Let’s dive into how you can draw Santa Claus!
Materials Needed:
- Pencil
- Eraser
- Black marker or pen
- Coloring materials
- Drawing paper
Step 1: Draw Santa's Head
Start by drawing a circle for Santa’s head. Add a horizontal and vertical guideline in the circle to help position his facial features later.
- Tip: Make the circle proportionate to the size of Santa's body. It doesn't need to be perfect—just a guide to work from.
Step 2: Sketch the Body
Below the head, draw a large oval for Santa's body. Santa is typically depicted as plump and round, so make the oval nice and wide. His body shape is like a pear, wider at the bottom.
- Tip: Don’t worry too much about detail here; just focus on getting the overall shape.
Step 3: Add Guidelines for Limbs
Now, lightly sketch in the arms and legs. Santa is usually drawn in a relaxed or jolly pose, so keep the arms bent at the elbows. His legs should be short and stocky to reflect his cartoonish proportions.
- Tip: You can experiment with different poses, such as having Santa holding a sack of presents.
Step 4: Draw the Hat
On top of Santa’s head, draw his iconic Christmas hat. Start with the base, which is a fluffy band wrapping around the top of his head. Then, draw the conical part of the hat, curving slightly to one side, ending in a fluffy pom-pom at the tip.
- Tip: Make the hat slightly droop to give it a relaxed, festive appearance.
Step 5: Sketch the Face
Next, it’s time to focus on Santa's face. Start by drawing his bushy eyebrows just above the horizontal guideline on his head. Below the eyebrows, draw two circles for the eyes. Add a small, round nose right in the middle. Santa’s cheeks are often depicted as rosy and plump, so you can lightly sketch in round shapes on either side of his face.
- Tip: Keep the eyes small and friendly, and exaggerate the cheeks for a joyful expression.
Step 6: Draw the Beard and Mustache
Santa’s beard is one of his most defining features. Start by drawing his mustache, which sits just below his nose. Make it bushy and curvy. Below the mustache, sketch the outline of Santa’s large, fluffy beard, following the shape of his face and extending downward.
- Tip: The beard can be drawn as flowing, soft lines with a fluffy texture to make it appear voluminous.
Step 7: Add Santa’s Outfit
Now, move down to Santa's classic red suit. Start by drawing the fluffy fur trim along the edge of his coat. The coat itself should be wide and open at the bottom, reflecting Santa’s round belly. Draw in his belt—a thick band across his waist with a large rectangular buckle.
- Tip: Don’t forget to add the fur trim to the sleeves and the bottom of the coat for that festive look.
Step 8: Draw the Boots and Gloves
At the end of Santa’s legs, draw his big, round boots. They should be short and simple, with a slight curve at the top to indicate the cuff. For his hands, draw Santa wearing thick mittens. His arms should be bent, and you can position the hands as if he’s holding something (like a present or his sack of toys).
- Tip: Keep the boots and gloves large and cartoonish, adding to Santa’s friendly appearance.
Step 9: Refine the Details
Now that you have the basic structure in place, go back and refine the details. Add a few lines to suggest wrinkles in Santa’s clothing. Emphasize his fluffy fur trim, and make sure his beard and mustache have a soft, flowing texture. You can also add extra elements like a sack of gifts or a small bell in one of Santa's hands.
- Tip: If you want to get creative, add a background with Christmas trees, snowflakes, or presents!
Step 10: Outline the Drawing
Once you’re satisfied with your sketch, use a black marker or ink pen to outline the entire drawing. Go over the major lines, including his face, beard, hat, and suit. Make the lines smooth and clear, and erase any unnecessary pencil marks afterward.
- Tip: Be careful around intricate details like the beard and fur trim to maintain the fluffiness.
Step 11: Add Color (Optional)
Santa is known for his bright red suit, so grab your coloring materials and begin by filling in his outfit with red. Color the fur trim, beard, and mustache white, and use black for the boots, gloves, and belt. Add color to his face—light pink for his rosy cheeks and nose—and a soft skin tone for the rest of his face.
- Tip: If you want to add shading, darken areas under his hat, around the belt, and where his arms and legs bend.
Conclusion
Drawing Santa Claus step by step is a fun way to get into the holiday spirit. By starting with simple shapes and gradually adding detail, you can create a delightful illustration of the Christmas icon. Whether you’re drawing Santa as a gift, decoration, or just for fun, this step-by-step guide will help you bring the jolly old man to life on paper.
Always Visit our blog Easy Kids Learning Corner


