

How to Draw a Butterfly: Step-by-Step Guide for Beginners
Butterflies are beautiful, delicate creatures that can be fun and rewarding to draw. Their symmetrical wings and intricate patterns make them a popular subject for artists of all skill levels. Whether you’re a beginner or just looking to refine your technique, this step-by-step guide will help you create a beautiful butterfly drawing. Let’s get started!
Materials You'll Need:
- Pencil (preferably HB or 2B)
- Eraser
- Paper
- Black ink pen (optional, for outlining)
- Coloring materials (colored pencils, markers, or crayons)
Step 1: Draw the Body of the Butterfly
Start by drawing a vertical oval in the middle of your paper. This will be the butterfly's body. Butterflies have a thin, elongated body, so make sure your oval is narrow. You can adjust the size depending on how large you want your butterfly to be.
Step 2: Draw the Head and Antennae
At the top of the body, draw a small circle for the butterfly’s head. From the head, draw two thin, curved lines extending outward for the antennae. The antennae should curve gently, adding to the delicate look of the butterfly.
Step 3: Draw the Upper Wings
Now that you have the body and head, it's time to draw the wings. Start with the upper wings. From the upper part of the body, draw a curved line that extends outward and then loops back toward the body. The upper wings should be larger and more rounded than the lower wings. Repeat this on the other side to create a symmetrical look.
Step 4: Draw the Lower Wings
Below the upper wings, draw the lower wings. The lower wings should be slightly smaller and less rounded than the upper wings. Start from the middle of the butterfly’s body and draw a curved line that extends outward and then curves back toward the body. As with the upper wings, make sure the lower wings on both sides are symmetrical.
Step 5: Refine the Shape of the Wings
Once you have the basic outlines of the wings, you can refine their shapes. Butterfly wings often have slightly jagged or scalloped edges, so you can add small curves or points along the edges of the wings to make them look more realistic. Take your time to adjust the shape until you’re happy with the overall look.
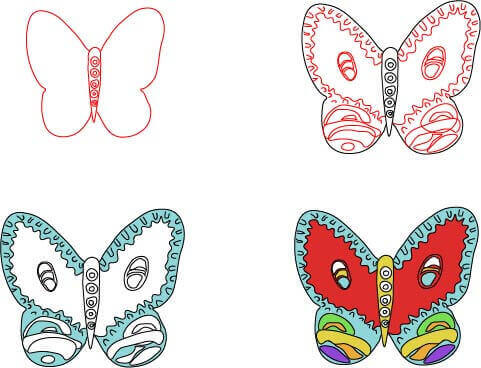
Step 6: Add Patterns to the Wings
One of the most distinctive features of a butterfly is the pattern on its wings. While butterflies have many different patterns, you can create your own unique design or base your drawing on a real butterfly species.
Start by adding shapes such as circles, ovals, or triangles inside the wings. These shapes can vary in size and placement but should generally be symmetrical on both sides. You can also add smaller details like lines or dots to give the wings more texture and intricacy.
Step 7: Outline Your Drawing
Once you’re satisfied with the details and patterns of your butterfly, it’s time to outline your drawing. Use a black ink pen or a darker pencil to carefully trace over the final lines of your drawing. This will make your butterfly stand out and give it a cleaner appearance. Be sure to erase any unnecessary guidelines or rough sketches.
Step 8: Add Color to Your Butterfly
Butterflies are known for their vibrant colors, so this is your chance to bring your drawing to life! Use your colored pencils, markers, or crayons to fill in the wings with bright colors. You can use a reference image of a real butterfly, or let your imagination guide your color choices. Remember to add shading or highlights to give your butterfly a more three-dimensional look.
Final Touches
After coloring, take a step back and evaluate your drawing. You might want to add some final touches, such as enhancing the patterns, darkening the outlines, or adding a bit more shading to the wings and body.
Final Tips:
- Butterflies are symmetrical, so try to keep both sides of your drawing as even as possible. If symmetry is challenging, you can draw one side first and then lightly trace it onto the other side using a soft pencil or lightbox.
- Don’t be afraid to experiment with different wing shapes and patterns. Each butterfly species is unique, and your drawing can be too.
- Practice makes perfect! If your first attempt isn’t exactly how you imagined it, keep trying. The more you practice, the more confident you’ll become in drawing intricate details.
With your butterfly now complete, you’ve successfully created a beautiful piece of art. As you practice and improve, you can explore drawing butterflies in various poses, styles, and settings. Enjoy the process and happy drawing!
Always Visit our blog Easy Kids Learning Corner
